The Foreman PXE provisioning with Libvirt
Posted: October 16, 2013 Filed under: AdminSys, Linux | Tags: CentOS, dhcp, dnsmasq, Linux, PXE, The Foreman 2 CommentsMore than just a Puppet management interface The Foreman can handle the whole lifecycle of servers, from their creations and provisioning (pxe + kickstart/preseed) to their management (puppet). Today’s blog post will highlight how to use the provisioning feature of The Foreman using Libvirt DHCP server (dnsmasq) for local testing purpose.
Pre Requisite
- An instance of a VM running foreman on libvirt, for this post version 1.3.0 of The Foreman is used, and CentOS 6.4 will be deployed.
Create the Operating System (The Foreman)
The Operating System
In the first time, simply fill the four first field and click submit. We will get back to it at a later point.
Path : More -> Provisioning -> Operating Systems -> New Operating System

Edit OS
The Architecture
Add an architecture one will be supporting for a set of OSes
Path : More -> Provisioning -> Architectures -> New Architecture

Edit Architecture
The Installation Media
For our case, the CentOS installation media already exist, one still have to click on CentOS and specify RedHat as Operating System family.
If you have a local mirror of CentOS repositories you could simply make the path points to it, installation will be much faster.
Path : More -> Provisioning -> Installation Media

Edit Installation Media
The Partion Table
A RedHat default partition tables is already present, for the purpose of the demo we will be using it but you might want to create your own one. Do not forget to specify the Operating System Family.
Path : More -> Provisioning -> Partition Tables

Edit Partition Tables
The Templates
The provisiong template section is where one defines its kickstart/preseed, PXE, gPXE, etc… scripts.
One can define snippets that can be embedded within scripts.
For the demo purpose we will be using two pre-existing scripts
- Kickstart Default PXELinux (PXELinux)
- Kickstart Default (provision)
Once one clicks on the Template, one needs to go the the Association tab on the presented page to associate it with the proper OS. Here it needs to be done twice for the Kickstart Default PXELinux and for the Kickstart Default scripts.
Path : More -> Provisioning -> The Provisioning Templates

Edit Provisioning Template
The Operating System
And back to the Operating System to bind it all together.
Path : More -> Provisioning -> Operating Systems -> CentOS 6.4
First you should be presented with the following page, pick the right options (Architecture, Partition Tables, Installation Media) for your OS

Edit OS – OS
Now go to template and associate the template accordingly

Edit OS – Templates
You can now save the OS.
Create the domain (The Foreman)
Here nothing fancy, simply fill up what is prompted. In the current scenario we don’t use The Foreman as a DNS.
Path : More -> Provisioning -> Domains -> New Domain

Edit Domain
Create the Subnet (The Foreman)
Here the Network Address is the one from your libvirt’s dnsmasq configuration. Normally you can guess if from a simple ifconfig eth0, else on the host run virsh net-dumpxml default, assuming you run the default network. Same thing applies for the Network Mask.
Select the appropriate domain (cf. Create The Domain) and then the most important make sure the smart proxy name is selected in the TFTP Proxy box.
Path : More -> Provisioning -> Subnets -> New Subnet
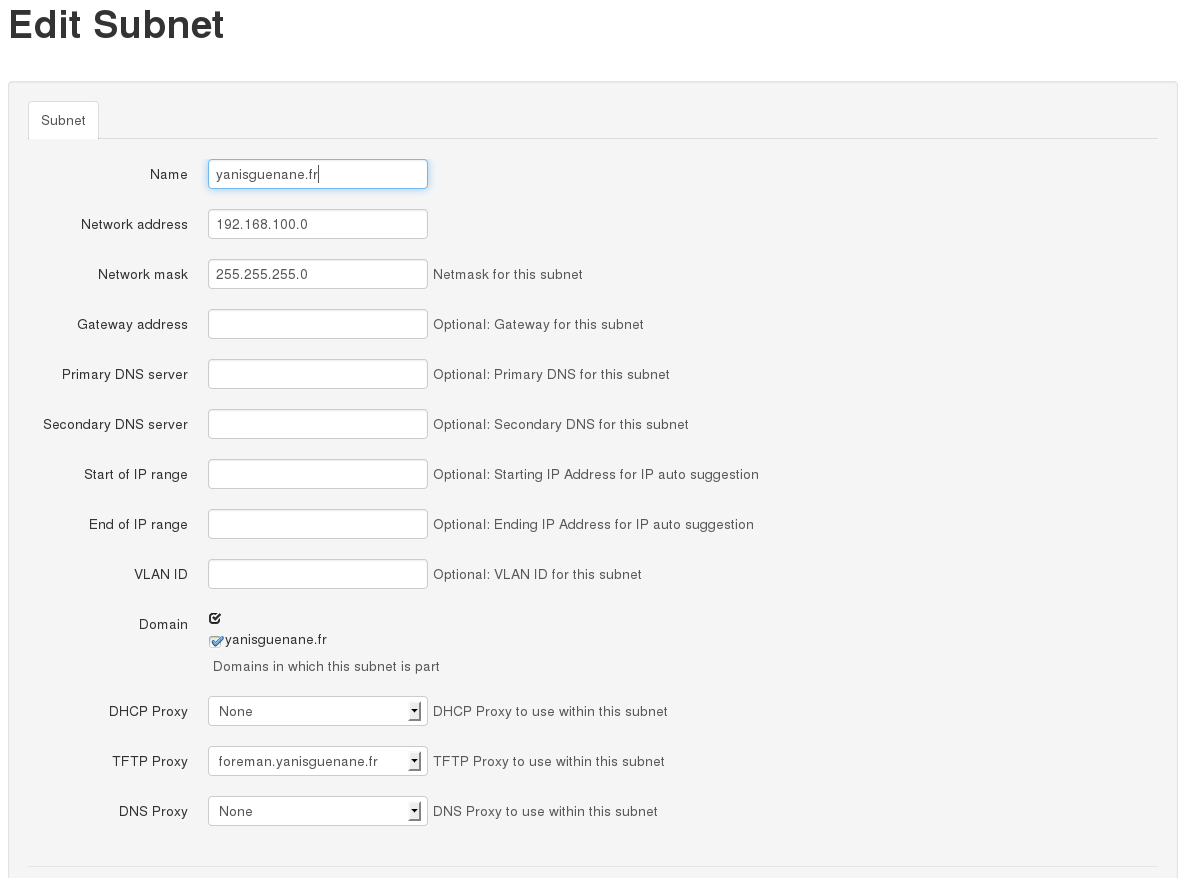
Edit Subnet
Create the VM with PXE boot (Libvirt)
Create the New VM with a PXE boot

node1 – PXE
For now you can stop the VM since the DHCP server is not configured. Please note the MAC address of the Virtual Machine, it will be needed on the later section
Configure dnsmasq for IP attribution and PXE boot (Libvirt)
Note your foreman VM and your node1 VM MAC addresses.
Stop your foreman VM now.
1. Destroy the network
virsh net-destroy default
2. Edit the current network to assign static ip
virsh net-edit default
Remplace
<ip address='192.168.100.1' netmask='255.255.255.0'>
  <dhcp>
    <range start='192.168.100.128' end='192.168.100.254' />
  </dhcp>
</ip>
by
<ip address='192.168.100.1' netmask='255.255.255.0'>
  <dhcp>
    <range start='192.168.100.128' end='192.168.100.254' />
    <host mac='52:54:00:CB:C3:C6' name='foreman' ip='192.168.100.169' />
    <host mac='52:54:00:89:2A:7E' name='node1' ip='192.168.100.170' />
    <bootp file='pxelinux.0' server='192.168.100.169' />
  </dhcp>
</ip>
3. Restart the network
virsh net-start default
What is being done here at step 2, is a static assignement of IP addresses by the DHCP server and the configuration of the PXE boot.
Static Assignement of IP address
<host mac='52:54:00:CB:C3:C6' name='foreman' ip='192.168.100.169' />
Here we tell dnsmasq that device with MAC address ’52:54:00:CB:C3:C6′ will always be assigned ip ‘192.168.100.169’
PXE Boot Configuration
<bootp file='pxelinux.0' server='192.168.100.169' />
He we tell devices that wish to do PXE boot, to get the file pxelinux.0 on the tftp server running on 192.168.100.169
You can now start the foreman VM, not node1 yet.
Create the Host (The Foreman)
Here fill up the information as needed, the specifics to PXE provisioning are the Network and Operating System tabs.
- In the Network tab, fill up the MAC address, the configured domain, subnet and the IP Address assigned in DHCP server.
- In the Operating System tab, select the Operating System you want your VM to be. (cf. Configure the Operating System)
Path : Hosts -> New Host

Edit Network Host

Edit Operating Syste
Start the VM (Libvirt)
Simply start the node1 VM, it will be assigned the static IP address and will retrieve the pxelinux.0 from the foreman server as specified in the DHCP server. It might take some time while the installation is processing.
Once the VM automatically rebooted, one needs to go to the foreman > hosts page and will see that the node1 is in a ‘No Changes’ state, meaning build was successful, puppet connected. The VM is now fully managed by The Foreman.
Conclusion
One can configure as many OSes as one wants with fully configurable kickstart/preseed scripts, themselves dynamically parametrizable. As of today, The Foreman is a solid solution to manage the whole lifcycle of servers, from creation to provisioning to management, providing the user with details – filtrable – reports of what is going on. On a personal note I would say that if you are managing puppet servers and you are not using The Foreman, you are doing it wrong. QED.
Resources
- The Foreman Manual http://theforeman.org/manuals/1.3/index.html
- Dominic Cleal Youtube’s videos about unattended installation http://www.youtube.com/watch?v=eHjpZr3GB6s
Network Access Server with a RaspberryPi : Part 1 – DNS
Posted: June 3, 2013 Filed under: AdminSys, Linux | Tags: dns, dnsmasq, raspberrypi 1 CommentThe RaspberryPi did not land in the market unnoticed. For about $35 you get a ready to work computer.
Many people have done amazing things with it – from IoT to distributed computation – other uses it as a full stack home media player. Other surely have a spare RaspberryPi and don’t know what they can do with it, the answer is a SMB grade Network Access Server (NAS)
This 3 part series intend to show how to use a RaspberryPi as a Network Access Server with enterprise services.
This specific blog post will be about providing a LAN with a local DNS resolver using dnsmasq, that will improve overall internet speed of the clients in the LAN and allow a network administrator to configure its host names in an easy fashion.
Note: The RaspberryPi is running Raspbian as its Operationg System
DNS Primer
It is taken for granted that the reader knows what is the basic function of a DNS server, translate a name to an IP address.
A DNS server in order to be effective has to match two criterias :
- Proximity
- Cacheability
Proximity
In the wild, they are two kids of DNS servers network types.
The first one, anycast network type. With anycast network type, several geographically separated DNS servers listen on the same IP address, the DNS server closest to you in terms of hops will answer your query, providing you with the lowest latency.
The second one, unicast networy type, With unicast network type, a single server listens to a single IP address. Meaning if you live in California and your DNS provider has its servers in California you will have low latency, but if a country-side european resident uses the same DNS server he will have a much higher latency.
Bottom line on proximity, the closer the better. The closest you can get to your computer – beyond 127.0.0.1- is your LAN. Having a DNS resolver on your LAN provides one with the second lowest possible latency.
Cacheability
One of the biggest challenge of Public DNS resolvers is Cacheability, more precisely shared cacheability. Due to the scale of the deployed infrastructure by those PublicDNS resolvers maintaining a common cache is somewhat a big technical challenge in itself.
When you clicked on spredzy.wordpress.com a DNS server answered the IP corresponding to the hostname and then cached the association IP <> Hostname for TTL time. So a user can think next time s/he will be hitting the DNS server for the exact same host name (within the TTL) the DNS query may be faster, well the answer is not necessarily.
Be it an unicast or an anycast network type, nothing can ensure one will end up on the exact same server two times in a row. (ie. Load balancer, etc…)
Bottom line on cacheability, by caching locally on a single server (the Pi) you won’t need to worry about shared cache. It will always be synced to itself
A note on dnsmasq name server feature
By deploying a DNS resolver within one local network, both proximity and cacheability issues are tackled. Also, but nonetheless, deploying dnsmasq on one local network will act as an authoritative source for local devices names defined in /etc/hosts. No more need to deal with BIND and DNS records such as ‘router A XXX.XXX.XXX.XXX’. Simply by inserting the line ‘XXX.XXX.XXX.XXX router’ in your host file your DNS server will provide you the correct IP address.
Installation & Configuration
Installation
sudo apt-get install dnsmasq dnsmasq-base
update-rc dnsmasq default
Configuration
As with most programs, dnsmasq configuration can be edited in the /etc/dnsmasq.conf file or by dropping configuration rules in /etc/dsnmasq.d directory.
In order to keep a clean configuration, only the listen-address parameter will be edited in /etc/dnsmasq.conf
listen-address=PI.IP.Addr.ess
Then, the extra configuration will be written in specific files under /etc/dnsmasq.d/
dns.conf
server=208.67.222.222                       # Primary DNS Server
server=208.67.220.220                       # Secondary DNS Server

server=/mydomain.com/Other.dns.ip.address   # Specific DNS server for a given domain name

bogus-nxdomain=67.215.65.132                # Return NXDOMAIN as it should (IP applies to OpenDNS)

all-servers                                 # All listed DNS servers will be queried the faster will be picked
Make your computer default DNS your raspberrypi
Once everything is set up, you need to let your computer know which DNS server to use. For this several options :
- Configure it directly in your DHCP server if you have access to (recommended)
- In Linux, either configure NetworkManager or your /etc/resolv.conf file to have the right DNS server
- In Windows configure your connection accordingly to use the right DNS
Also the /etc/hosts file will be edited to highlight the name server feature of dnsmasq
192.168.42.41    printer    printer.localdomain
192.168.42.1     router     router.localdomain
192.168.42.13    storage    storage.localdomain
Test
For tesing the performance of using the RaspberryPi as a DNS server the following script was ran 10 times from a laptop connected to a router via WiFi.
Using the RaspberryPi as DNS server
#!/bin/sh

sleep 2 && dig wordpress.com | grep 'Query time:'
yguenane@laptop:~$ repeat 10 ./dns.sh
;; Query time: 102 msec
;; Query time: 31 msec
;; Query time: 28 msec
;; Query time: 29 msec
;; Query time: 32 msec
;; Query time: 29 msec
;; Query time: 29 msec
;; Query time: 30 msec
;; Query time: 28 msec
;; Query time: 29 msec
Using OpenDNS as DNS server
#!/bin/sh

sleep 2 && dig wordpress.com @208.67.222.222 | grep 'Query time:'
yguenane@laptop:~$ repeat 10 ./dns.sh
;; Query time: 103 msec
;; Query time: 131 msec
;; Query time: 133 msec
;; Query time: 132 msec
;; Query time: 134 msec
;; Query time: 131 msec
;; Query time: 131 msec
;; Query time: 133 msec
;; Query time: 134 msec
;; Query time: 133 msec
Using Google PublicDNS as DNS server
#!/bin/sh

sleep 2 && dig wordpress.com @8.8.8.8 | grep 'Query time:'
yguenane@laptop:~$ repeat 10 ./dns.sh
;; Query time: 136 msec
;; Query time: 135 msec
;; Query time: 131 msec
;; Query time: 131 msec
;; Query time: 131 msec
;; Query time: 132 msec
;; Query time: 132 msec
;; Query time: 136 msec
;; Query time: 131 msec
;; Query time: 131 msec
One can see the – big – response time difference from the RaspberryPi compared to the PublicDNS servers once the entry is cached.
For the name feature, one can simply ping printer and see that 192.168.42.41 will be pinged.
Cache can be tuned thanks via cache-size, no-negcache, local-ttl and neg-ttl options. Refer to the man pages for more details.
Conclusion
BIND is a great product, it does well what is has been conceived for, but the entrance barrier might be high for a non networking-related profile. Dnsmasq is a lightweight yet mature alternative for SMBs. It allows one, totally unfamiliar with DNS records to set up a name server easily for an entire network.
In this first part we only focused on the DNS feature of dnsmasq, but it has much more it can provide. Next part will focus on the DHCP and PXE Server feature.
